I’m a software engineer specializing in building Web Backends and Cloud-based Solutions.
Introduction
If I mention a tool revolutionizing, the software development industry, then GIT will be Number One on the list. But as Uncle Sam told us, “Great power comes with great responsibility”.
So like any other tool, we need to learn how we can use GIT in our day-to-day software development life-cycle so that we can use it optimally and we can get the most features out of it.
Here in this story, I will describe an end-to-end GIT workflow to manage Enterprise applications and libraries with the power of GIT and version control.
Why should you use the model?
The following workflow is created by considering the following facts:
The workflow must be flexible and easy to use.
The workflow must not take very long steps to implement in your existing ecosystem.
The workflow should use all good features like merge, rebase, pull request, and branching.
The production and the staging should be on separate branches for optimal tracking of the releases.
The workflow also features hot fixes for production to support agility and separate release and feature branches in place.
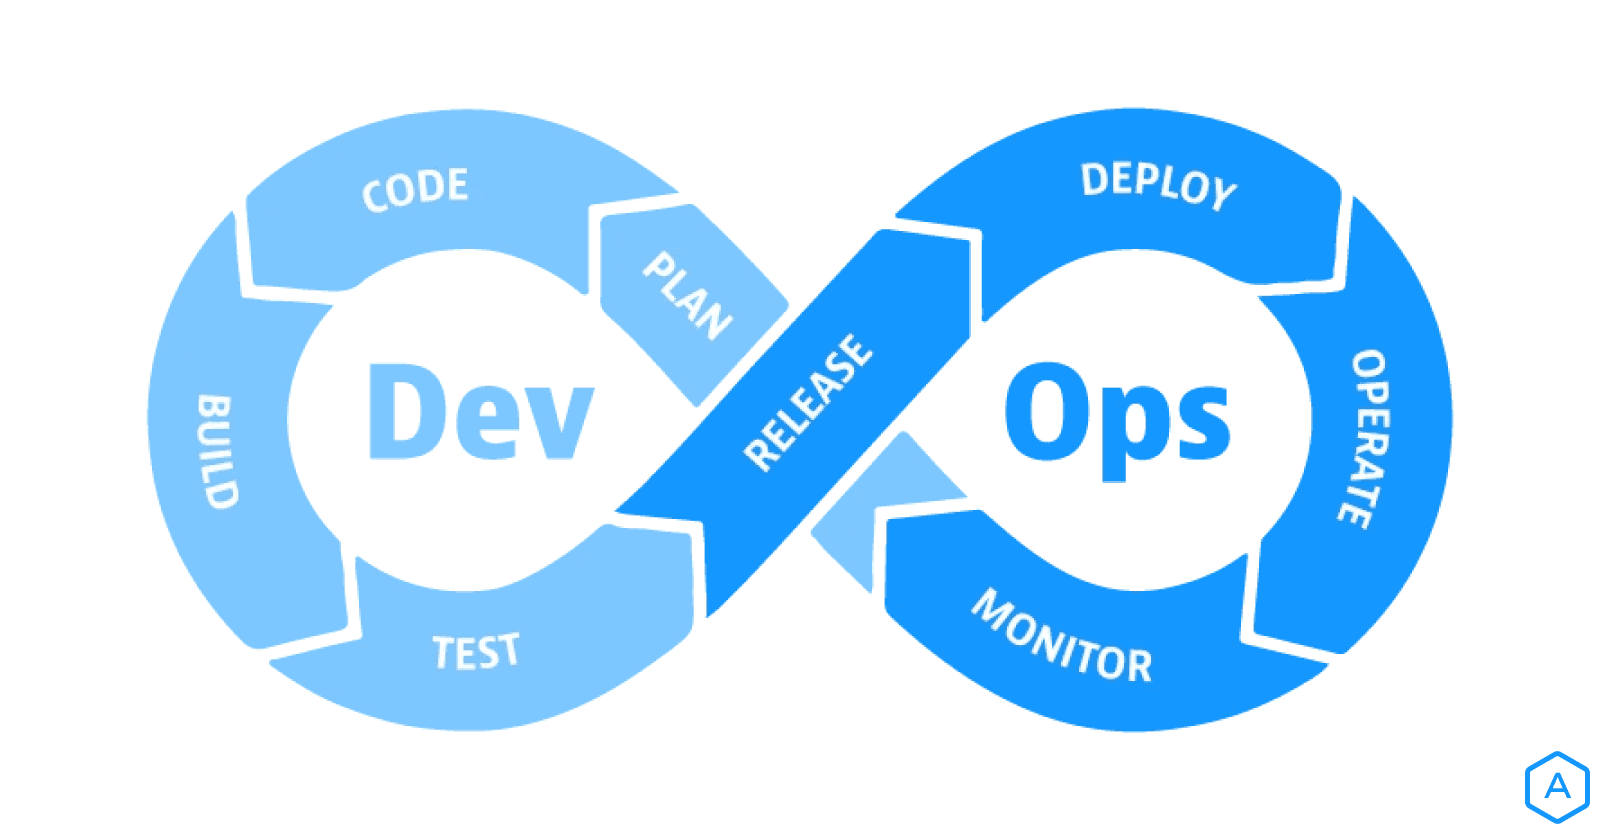
The workflow is also built considering the modern-day DevOps ecosystem and continuous integration and continuous deployment pipelines (CI-CD).
Workflow Model
The Main Branches
The model suggests considering Git branching strategies. It uses separate branches for the production and staging environment. The central repo holds two main branches with an infinite lifetime:
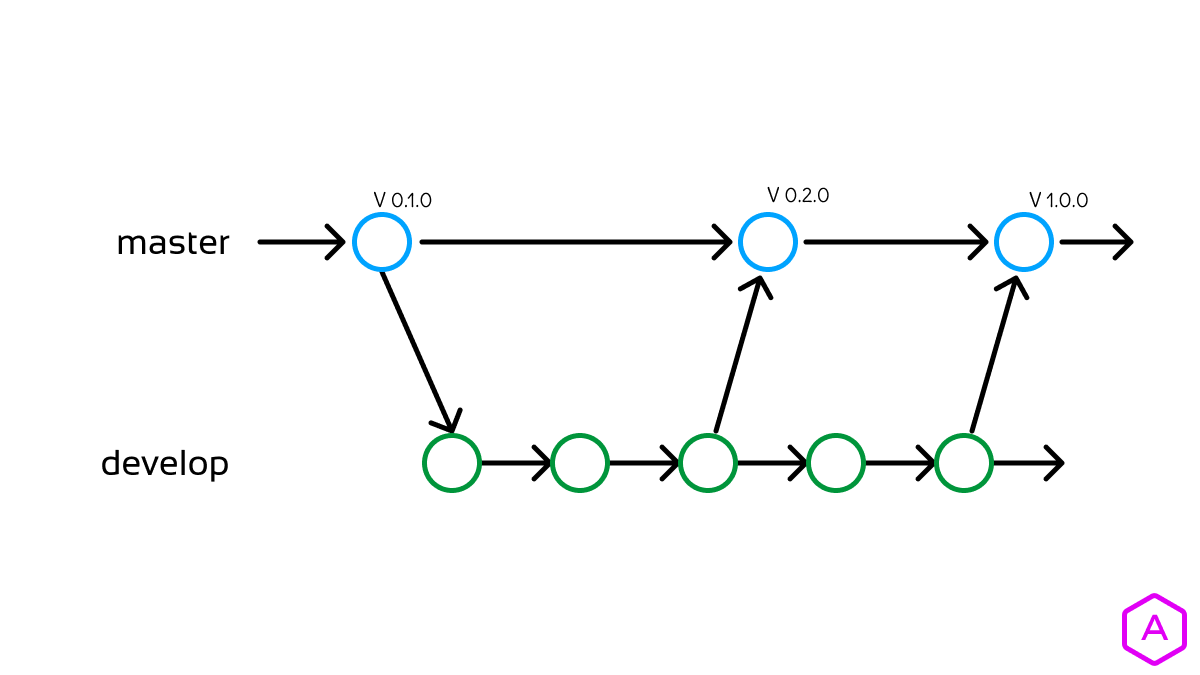
1. master
We consider origin/master to be the main branch where the source code of HEAD always reflects a production-ready state.
Therefore, each time changes are merged back into the master, this is a new production release by definition.
2. develop
Parallel to the master branch, another branch exists called develop. We consider origin/develop to be the main branch where the source code of HEAD always reflects a state with the latest delivered development changes for the next release and reflects the staging environment.
When the source code in the develop branch reaches a stable point and is ready to be released, all of the changes should be merged back into master somehow and then tagged with a release number.
The Supporting Branches
In addition to the primary branches, master and develop, our development approach incorporates several auxiliary branches.
These auxiliary branches serve multiple purposes, such as facilitating concurrent development among team members, simplifying feature tracking, preparing for production releases, and providing swift solutions for live production issues. Unlike the main branches, these auxiliary branches are temporary in nature and are eventually slated for removal.
The different types of branches we may use are:
Feature branches
Release branches
Hotfix branches
Feature Branches
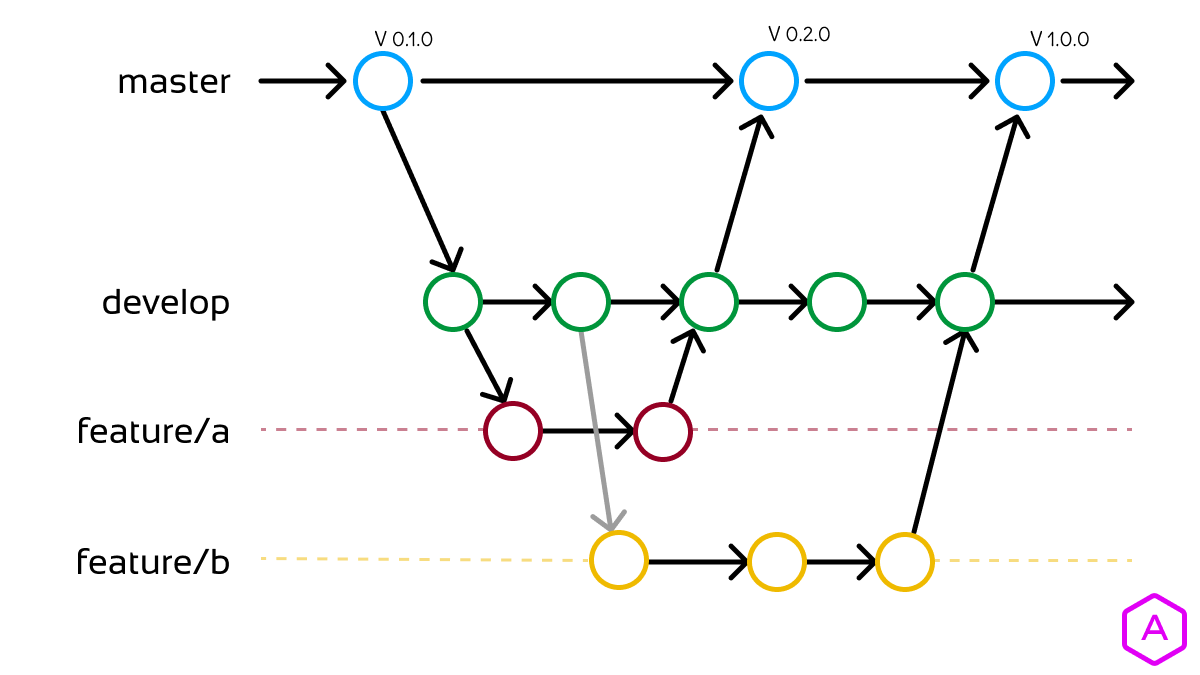
Feature branches, also known as topic branches, are employed for the creation of new features intended for inclusion in either upcoming or more distant future releases.
The core concept of a feature branch is its lifespan, which extends only for the duration of the feature's development, and it is subsequently removed once the feature is completed.
Feature Branches are branched off from:
developFeature Branches are merged back into:
developBranch naming convention:
starts with
feature/anything except
master,develop,release/*, orhotfix/*Example:
feature/a,feature/b
Create a feature branch
git checkout -b feature/foo develop
# This will create a feature branch named feature/foo from develop
Incorporating a finished feature on the develop
git checkout develop
# This will checkout/open the develop branch
git pull
# Let's pull the latest changes from origin
git merge --no-ff feature/foo
# This will merge feature/foo into develop
git branch -d feature/foo
# Delete our short lived feature branch
git push origin develop
# Push our updated develop branch
The --no-ff flag causes the merge to always create a new commit object, even if the merge could be performed with a fast-forward. This avoids losing information about the historical existence of a feature branch and groups together all commits that together added the feature. Learn More
Release Branches
Release branches support the preparation of a new production release.
The optimal time to create a new release branch from the develop branch is when the develop branch accurately represents the desired state for the upcoming release.
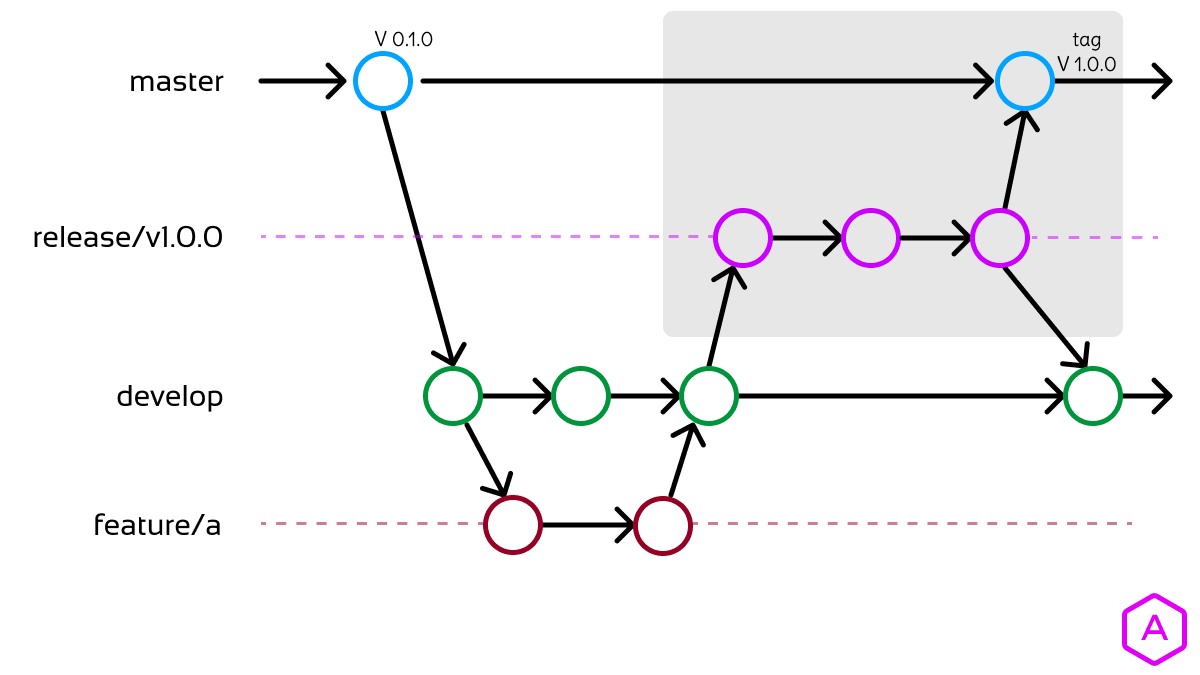
Release Branches are branched off from:
developRelease Branches are merged back into:
developandmaster.Branch naming convention:
starts with
release/anything except
master,develop,feature/*, orhotfix/*Example:
release/v1.0.0,release/v1.1.0
Create a release branch
git checkout -b release/v1.2.0 develop
# Switched to a new branch "release-1.2"
./bump-version.sh 1.2.0
# A special file to update the version in the files
git commit -a -m "Chore: v1.2.0"
# Commit for v1.2.0
What is bump-version.sh?
The bump-version.sh is a specific file designed to facilitate version updates within our source code. It could be used to update version information in different configuration files or metadata, such as:
Python (setup.py): You can utilize
bump-version.shto increment the version in a Python project's setup.py file, which is often used for packaging and distribution.Java (pom.xml): In a Java project managed by Maven, the script could be used to update the version defined in the pom.xml file, a crucial part of Maven-based builds.
Ruby (Gemfile): For Ruby applications managed with Bundler, you might employ the script to adjust the version specified in the Gemfile.
C# (.csproj): In a C#/.NET project, it could be used to modify the version in the project's .csproj file, which is essential for building and packaging.
Docker (Dockerfile): For containerized applications, the script could update version labels in the Dockerfile, ensuring version consistency across containers.
Frontend (package.json, manifest.json): In web development, it can also be applied to update version information in frontend files like "package.json" (for Node.js projects) or "manifest.json" (for web applications).
The bump-version.sh file serves as a versatile tool for maintaining version coherence in various development contexts.
Here is an example of bump-version.sh file in the context of the package.json file
#!/bin/bash

# Check if an argument (new version) is provided
if [ $# -eq 0 ]; then
    echo "Usage: ./bump-version.sh <new_version>"
    exit 1
fi

# Define the new version
new_version="$1"

# Update the "version" field in package.json
jq --arg new_version "$new_version" '.version = $new_version' package.json > temp.json && mv temp.json package.json

echo "Version updated to $new_version in package.json"
Incorporating the release branch
Releasing into the master
git checkout master
# This will checkout/open the master branch
git merge --no-ff release/v1.2.0
# Merge the release branch into master
git tag -a v1.2.0
# Create a tag for v1.2.0 in the master
Merging back to develop
To keep the changes made in the release branch, we need to merge those back into the develop branch, though. In Git:
git checkout develop
# This will checkout/open the develop branch
git merge --no-ff release/v1.2.0
# Merge the release branch into develop
Now we are really done and the release branch may be removed, since we don’t need it anymore:
git branch -d release/v1.2.0
# Delete our short lived release branch
Hotfix Branches
Hotfix branches share similarities with release branches, as they also serve the purpose of preparing for a new production release, albeit under unplanned circumstances.
They emerge as a response to the urgent need to address an unforeseen issue in a live production version. In situations where a critical bug in a production version demands immediate attention, a hotfix branch can be created by branching off from the corresponding tag on the master branch, which designates the production version.

Hotfix Branches are branched off from:
masterHotfix Branches are merged back into:
developandmaster.Branch naming convention:
starts with
hotfix/The name will contain the tag from which you are branching off.
anything except
master,develop,feature/*, orrelease/*Example:
hotfix/v1.0.0,hotfix/v1.1.0
Create a hotfix branch
git checkout -b hotfix/v1.2.0 develop
# Switched to a new branch "release-1.2"
Now fix the bug(s) and commit the fix in one or more separate commits.
./bump-version.sh 1.2.1
# A special file to update the version in the files
git commit -a -m "Chore: v1.2.1"
# Commit for v1.2.0
Incorporating the hotfix
Releasing into the master
git checkout master
# This will checkout/open the master branch
git merge --no-ff hotfix/v1.2.1
# Merge the release branch into master
git tag -a v1.2.1
# Create a tag for v1.2.1 in the master
Merging back to develop
To keep the changes made in the release branch, we need to merge those back into the develop branch, though. In Git:
git checkout develop
# This will checkout/open the develop branch
git merge --no-ff hotfix/v1.2.1
# Merge the hotfix branch into develop
Now we are really done and the release branch may be removed, since we don’t need it anymore:
git branch -d hotfix/v1.2.1
# Delete our short lived hotfix branch
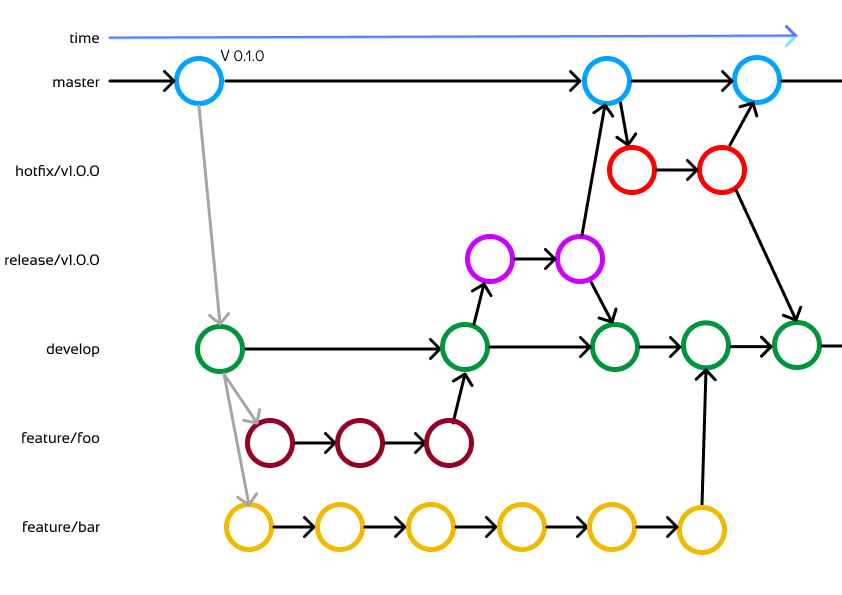
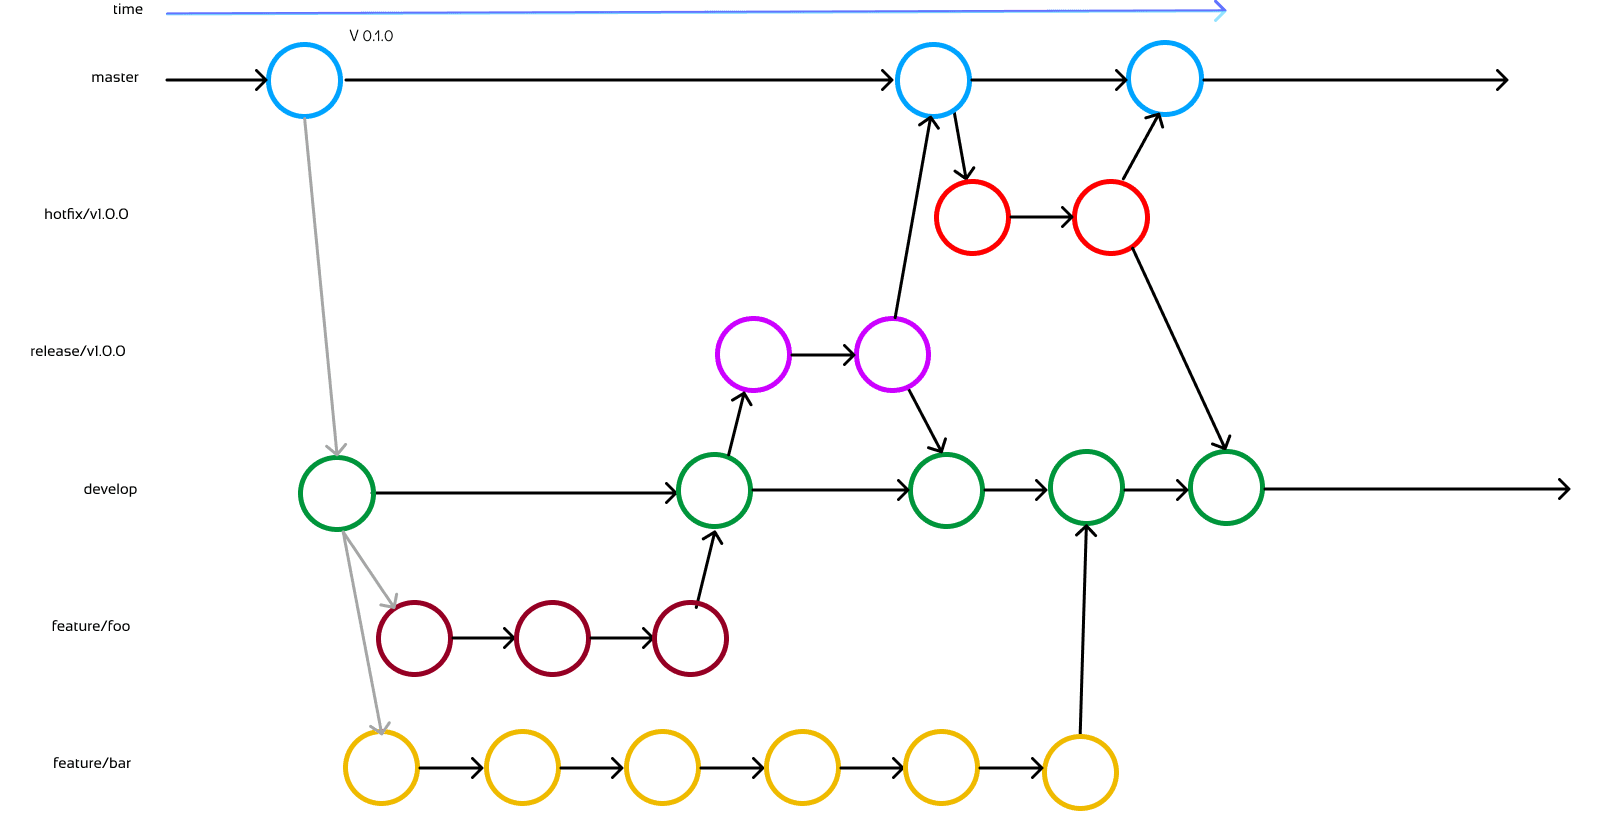
The Big picture